How to Make a Shield in Minecraft?
In the vast and pixelated world of Minecraft, where creativity knows no bounds, crafting a shield can mean the difference between triumph and defeat. Whether you’re battling menacing mobs, exploring mysterious caves, or simply looking to protect yourself from the perils of the blocky universe, mastering the art of crafting a shield in Minecraft is essential. This comprehensive guide will walk you through the process step by step, ensuring that even novice player can create their very own shield with ease.
Materials You’ll Need
To start your journey into shield-making, gather the following materials:
- Wooden Planks: Begin by collecting wooden planks from trees. You will need 6 Wooden Planks to craft a 3×3 Grid. Any type of wooden plank will work – oak, spruce, birch, jungle, acacia, or dark oak.
- Iron Ingot: You’ll need an iron ingot, which you can obtain by smelting iron ore in a furnace. Mine iron ore using a stone pickaxe or higher to get the raw material.
- Shield Design (optional): While not required, you can add a personal touch to your shield by crafting it with a custom design. This requires a banner, which can be crafted using wool and a crafting table.
Crafting Your Shield in Minecraft
Once you’ve acquired the necessary materials, follow these steps to craft your shield:
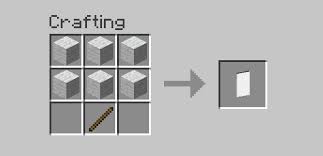
- Open Crafting Table: Right-click the crafting table to open the 3×3 crafting grid.
- Place Wooden Planks: In the top row of the grid, place one wooden plank in the center slot and one below it.
- Place Iron Ingot: In the middle row, put the iron ingot in the center slot.
- Finalize the Shield: Drag the crafted shield from the crafting table into your inventory. Voila! You’ve crafted your very own shield.
Customizing Your Shield in Minecraft
For those who want to add a touch of uniqueness to their shield, here’s how you can customize it with a design:
- Craft a Banner: Create a banner by placing six wool and a stick in the crafting table, arranging them in a pattern that suits your style.
- Apply the Design: Place your crafted banner and shield in the crafting table, with the banner above the shield. This will combine the two items and transfer the banner’s design onto the shield.
Mastering Shield Usage
Your newly crafted shield isn’t just for show – it’s a powerful tool for defense. Here’s how to use it effectively:
- Equip the Shield: Drag the shield from your inventory into your hotbar.
- Raise the Shield: Right-click (or left trigger) to raise the shield, which will provide you with protection against incoming attacks.
- Block Attacks: When facing enemies, use your shield to block incoming projectiles and melee attacks. Timing is key – raise the shield just before impact for maximum protection.
- Dual-Wielding: You can wield your shield alongside other items, like a sword or bow, by holding them in your main and off-hand slots.
For More Information Visit
Conclusion
In the blocky realm of Minecraft, crafting a shield is a crucial skill that can turn the tide of any battle. Armed with this step-by-step guide, even beginners can create and customize their own shields with ease. Remember, timing and strategy are vital when it comes to using your shield effectively. So go forth, brave miner, and face the dangers of the world with your newly crafted shield by your side.
Other Minecraft Guides You Might Also Like:
How to Make Smooth Stone in Minecraft
How to Breed Horses in Minecraft